Do you always make your own bread at home? If so, having to buy additive-laden, fluffy-nothing bread when you’re camping is a bit of a shame.
Can you bake bread and make cakes in a tent, a campervan or a caravan? Can you bake on the campfire or barbecue?
These are the questions we’ve put to some baking experts…

Why would you want to bake when camping?

To be honest, if you’ve never made bread before or you make it just once in a while, a camping trip is probably not the time to start exploring the magic of yeast and sourdough.
Instead, hunt out those great little bakeries where you’ll find proper bread that’s been allowed to rise in its own time and hasn’t been stuffed with flour improvers.
But if you do want to have a go…
…it’s very possible and there are lots of options to make it easy, and various cooking methods. It’s also a lot of fun to experiment.

Vicki Burnett says: “I often bake cakes and biscuits when we’re away. These Easter buns (with jam made in the van too) are my favourite and always go down well with campsite neighbours.”
Making a cake takes a certain amount of cussedness, but why not! Again, the easiest option is a ready mix and buns or cupcakes rather than a three-tier gateau. Otherwise, weigh out ingredients before you leave so that you need only add the egg or vegan alternative, plus liquid.
Bread is basically just flour, yeast, water and a little salt. You can also buy ready mixes so that you need only take one bag of ingredients with you. The tricky part when camping is a space to knead, a warm place for proving and a way of baking your loaf or rolls…but here are a couple of tips:
- You can take frozen dough and even frozen sourdough starter. A large silicone mat can turn a (sturdy) camping table or campervan worktop into a kneading surface.
- Try a no-knead recipe. Mix half your flour with your yeast, salt, sugar (if using) and liquid. Mix it well and leave covered till it goes frothy (about 15 minutes). Add the rest of the flour and knead five times in the bowl. Leave it to rise and knead another five times. Shape, put it in a tin and cook!

- Try a dough bag for mess-free kneading. I found it a bit frustrating, but I can see it has a place when camping. Or use fairly sturdy disposable or washable gloves…a revelation for mess-free kneading hands. Make sure they’re food-safe and powder-free.

Stoves, pans, barbecues and more – how to bake your bread
Campers are ingenious, adventurous and experts at finding novel ways to cook.
Sue-Jane Barton makes bread in a small, lidded Le Creuset-style casserole on a simple two-ring stove. “I suppose it’s sort of steamed,” she says, “but I cooked it on one side and then turned it over to crisp up the top.”

It’s a variation on the Dutch oven, which is a great way of making bread – and some say you can get away without kneading!

Easy breads – flatbreads, soda bread, campfire bread

Jack Hughes’ Irish soda bread
“Every time I go camping I make Irish soda bread on a Trangia stove! Nothing better than waking up in a forest on a Saturday and having fresh bread. Traditionally, it was made on an open fire and griddle. I usually just make it in a frying pan. No yeast involved and it only takes 20 minutes.
To make a small loaf or rolls, use 225g flour (plain, wholemeal, anything other than bread flour), 225ml buttermilk (or ordinary milk with a tablespoon of lemon juice), salt and one teaspoon of bicarb. Some people add a little honey, treacle or sugar. Mix, but not too vigorously or for too long. Adjust the quantities to get a dough that’s sticky but firm. Flatten out into one loaf (and score in quarters) or make small flattish rolls.
Cook on a dry griddle, frying pan or baking stone (hot but not smoking) for 10 minutes or so. The bread should swell up. Turn over for five minutes and then leave in a cooler part of the pan for a couple of minutes to dry out a little.

Flatbreads and pancakes
Veronique Walraven says that if your campfire is hot enough, you can make a simple Middle Eastern type flatbread – and you don’t even need a pan. Make your dough (flour, water, salt), form it into a fairly flat shape. Put it straight into the hot ashes and cover with more hot ashes. Cook for around 10 minutes and scrape off the ash. Voilà – lovely, crusty bread.
Christine Stock swears by a cast-iron bakestone and makes flatbreads, drop scones and Welsh cakes on it. Bakestones conduct heat evenly and can be used over an open campfire (this type may have a hanging handle to attach to a tripod), a gas stove or a barbecue like the Cobb or LotusGrill.
Leftover potatoes from the night before? Potato cakes! Just mash them up and make sure they’re fairly dry, add some self-raising flour (or plain and baking powder), a big knob of butter or margarine and salt and pepper to taste. Mix to a soft but manageable dough and form into flattish cakes ready for cooking on the griddle or bakestone.
Bread on a stick

Neil MacKinnon recommends the Wild Gourmets cookbook – not just for baking, but he particularly likes the tip on making bread wrapped around a stick – sometimes called a damper.
All you need is 500g self-raising flour, 200ml of water and the flavourings of your choice – sugar and cinnamon, salt, parmesan, herbs…whatever you fancy. Knead the dough till it’s stretchy, pull of sections and form into a sausage shape about the thickness of your thumb. Using a greenwood stick (so it won’t catch fire), wrap your dough sausage around, leaving a gap for it to expand. Turn over the embers till it’s brown and sounds hollow when tapped. It’ll slide off nicely.
There’s a little Kindle book of Australian damper recipes that’s got great ideas. We’ve cooked the olive and sun-dried tomato damper.
The Outbacker or DWD stove
If you haven’t come across this great portable stove before, have a look at our article on wood-burning stoves.
Basically, though, this is a wood-fired little stove with a long chimney and some great accessories, including a water boiler. It’s light to carry and easy to set up and get roaring. It’s also great for cooking on, once you learn to work with the temperatures.
We’ve cooked curry and chapatis on ours (the bread directly on the top). Tent-camper Jane Roberts Davies uses a focaccia recipe from Delia Smith’s classic cookbook Summer Collection, but she’s also used bread mixes from the supermarket.

“The problem can be finding a warm place for it to rise,” says Jane. “Summer is fine as a nice hot tent is ideal! Once risen, I put the oiled griddle pan directly over the flames to heat up. When it’s good and hot, you can put the cover back over the hole and stand the pan back on it.”
There’s a lot of guesswork and a bit of flame stoking to keep the heat up. Once one side is cooked, you turn it over and brush with more oil, sprinkle with chopped rosemary, sea salt and garlic. Perfect for mopping up spicy stews and hearty soups!
You can bake bread and cakes inside the wood stove too. The stove needs to be very hot and you then push the fire right to the far end. Don’t let your loaf tin touch the fire or get too close and don’t open the door for ten minutes. After that, keep checking and turn the tin now and then. It’s not a precise art, but very satisfying when you pull out a beautiful crusty loaf.
Got a mess tin? Make a no-knead bread in minutes. Use plain, wholemeal or spelt flour, add a pinch or two of baking powder and salt, along with seeds or anything else you want to jazz it up with. Then mix with (preferably carbonated) water to get a dough. Lift out the dough, oil the tin, replace the dough, cover with foil and cook in the oven.
Try this pan-cooked chocolate chip cookie!

- 6 tablespoons butter or similar
- A cup of sugar
- A large egg (or vegan alternative)
- 1 teaspoon vanilla extract
- 1 cup plain flour + 1/2 teaspoon bicarb (or use self-raising)
- 1/2 teaspoon salt
- 1 cup chocolate chips or chopped-up bar of chocolate
Light your stove and give it half an hour to come up to temperature. You don’t want a fierce burn.
In a big bowl, cream the butter, sugar, egg and vanilla. Fold in the flour, chocolate and salt. Pile into a pan with a lid, Dutch oven or frying pan (tinfoil lid). Cover and place towards the back of the Frontier. If you’re worried it’s too hot, raise the pan on a barbecue rack or similar. It’ll take around 15 minutes but check for burning!. It should be gooey in the middle and crisp on the outside edge.

The Cobb and LotusGrill barbecues
The Cobb is a very efficient and stylish barbecue that doesn’t smoke. We managed to make a batch of cupcakes on a first attempt. The bottoms were a little charred, but they rose well and tasted great.
There’s a full article about the Cobb if you’ve not come across them before. Another option is the LotusGrill, which is similar but has a battery-operated fan (its lid is an optional accessory, though).
The main problem with baking on a barbecue is that the heat is concentrated on the base of whatever you’re cooking. The Cobb comes with a lid to keep the heat inside and more even. However, you’ll want to find a way of raising the cooking surface because to generate enough heat for the time it takes to bake means stacking up the charcoal or briquettes.
Both have accessories that include pizza stones and cast-iron baking stones, so making flatbreads and pancakes is easy. Both also make a good stove for using with a Dutch oven (though you won’t get very long cooking times).
I wouldn’t buy a Cobb or LotusGrill just for baking, but they’re both versatile, so it’s fun to have an experiment – maybe next time I won’t get a charred bottom!
The Cadac Safari Chef is our long-time favourite camping stove, and it comes with a pizza stone and cast-iron griddle/skillet, as well as lots of other accessories.
You can get high-pressure ones that run on a screw-in canister or (our preferred option) a low-pressure that uses larger gas cylinders and a hose. We’ve written a full review of the Cadac.

Jane Roberts Davies is planning to make muffins on hers, and we’ve made pizzas and flatbreads. Now, a loaf or a cake is another thing. Given that Jane managed to roast a chicken in a lidded casserole dish, how hard can it be to make bread on the Cadac! And, as Jane says: “The food always seems to taste better after all that effort and it really brings out the pioneering spirit!”
You’ll need the Cadac’s rack, a piece of foil to protect the bottom of your loaf and the lid to create a ‘kettle baking’ set-up. Getting the gas level right takes trial and error, but you can expect a loaf to take around 30-45 minutes to cook. Cakes can be made in a tin placed on the rack in much the same way.
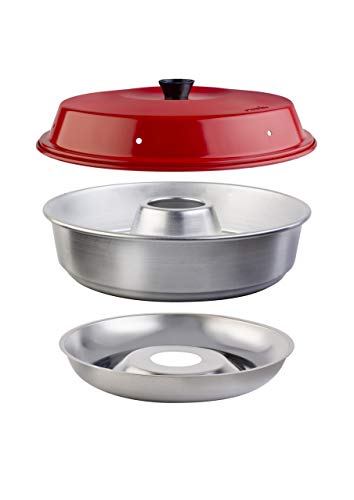
The Omnia stovetop cooker
The Omnia is a lightweight, aluminium pan that sits on a gas ring, hotplate or camping stove. The three-part design generates both top and bottom heat, and can be used to cook all sorts of foods, not least bread and cakes.
It’s easy to store and very versatile. Standard recipes should work, but you need to grease and dust the tin very well to avoid sticking. You’ll usually use a a low heat and bake for between 30 minutes and an hour, depending on the quantity. All your bread and cakes will be ring-shaped, of course!
Meanwhile, rather than spending money on a new gadget, have a look at Delene’s clever use of an old pressure cooker (below).
Pressure cooker baking
Delene Keenlyside loves baking. She makes all her own bread, cakes, scones, pies and pastries. She and her husband also have a motorhome with two gas rings but no oven, plus they do a lot of wild camping.
“I needed to find a way to make bread when touring, ” she says.
So, she came up with a pressure cooker method, using a dry pan, gasket removed and weight removed (so no pressure!). A cooker with one of those swivel weights that doesn’t come off won’t work, I’m afraid. You really want that old one that’s been in your cupboard for years!
 Delene’s No Oven Bread
- 350g strong bread flour
- 5g salt and 5g sugar
- a sachet (7g) easy yeast
- around 275ml (approx.) water with a glug of sunflower or olive oil
Mix into a slightly sticky, solid dough. Knead till it’s no longer sticky and becomes elastic. Leave to rise, covered, in the bowl. When it’s doubled in size, knock it back and leave to rise in a greased tin that will fit into your pressure cooker.


Put a ring (a metal cooker cutter, for example) in the bottom of the pan and then put the trivet on top of that. Put the lid on and heat up for five minutes or so on the stove (no gasket and no weight, remember!).
A strip of foil under your tin makes it easy to lift in and out. Put your tin on the trivet and put the lid back on. You want a low heat now, for around 20 to 25 minutes. Check the bread and simply pop back in for a bit longer if it’s not quite done. You’ll soon get the hang of it!

To bake a cake, you use exactly the same pan technique. Delene makes a fantastic pear and frangipane cake in her pressure cooker.

The electric Remoska
While we haven’t tried a Remoska yet, there are some serious fans out there in camping land. Beth Loft is one. She makes her own bread at home, but uses Wrights ready mixes when camping. Nicky Thomas is another Remoska convert – “It’s brilliant for most things. I even use it in the house nearly every day. You do need EHU when camping, though.”

A bit like a slow cooker to look at, the Remoska comes in two sizes – Standard and Grand. It has a simple on/off switch, no graded heat control and is low-wattage (400W and 650W). It cooks between 190 and 220 degrees C. You can also get a shallow pan, a separate rack and a separator to use with it.

The Remoska works just like an oven, except that you cook from cold. You can use it to cook ready meals in foil containers or pre-prepared food from frozen and to defrost and re-heat food. You can either put your food inside or use an ovenproof dish or foil. Baking in the Remoska is brilliant, if a bit of a trial-and-error affair. It’s easy to burn things!
“My other half has a sneaky fondness for cake mixes,” says Beth Loft. I confess it makes life simple in the van, with no need for weighing and measuring and no need for specific bakeware as the cardboard tray comes in the box. It fits in the Remoska and the bake works really well.”
But if you want to work from scratch, here are just two tried and tested Remoska baking recipes.
Wholemeal walnut bread
- 500g strong wholemeal flour
- 1 tsp salt
- 1 tsp sugar
- 1 tbsp oil
- 7g sachet fast action dried yeast
- 50g chopped walnuts
- 1 tbsp black treacle
- 275ml warm water
Mix flour, salt and sugar together. Add the oil. Mix in the yeast, and add the treacle and water. Mix to a loose dough and knead for five minutes. Mix in the walnuts. Mould into two cobs and place in the Remoska pan. Cover and stand in a warm place. When doubled in size, place lid on and bake for 30 minutes.
Scones
- 225g plain flour
- 50g margarine
- 1tsp baking powder
- 40g sugar
- One egg (or vegan replacement
- 100ml milk or mylk
Rub the marg into the flour and baking powder. Add the sugar and sultanas. Whisk the egg and milk together, make a hollow in the flour and pour the liquid in, saving a small amount for brushing the tops. Mix lightly and roll out to approx 2cm thick. Cut into rounds, brush with the remaining liquid and cook in the Remoska for 15–20 minutes till pale gold
And a word or two on sourdough

Rhydd Knight recommends Andrew Whitley’s Do Sourdough book, especially for the Overnight No-Knead Sourdough. “It involves a little starter and some dry flour in your rucksack, and a 24-hour rise. It’s quite a thing to rock out the artisan bread in the middle of a long expedition!
And for a great holiday read – with humour and heart – read Robin Sloan’s Sourdough.
Here’s a basic sourdough starter recipe

- Put 100g flour (preferably rye) in a large glass jar. Add an equal weight of tepid water. cover with something porous (kitchen roll or cheesecloth).
- Leave in a warm but not hot place for a few days. When bubbles form and the mixture swells, the wild yeast has arrived!
- After another day or so, you should have a lively starter that’s ready to feed. Keep it in the fridge and give it an equal amount of flour and water once a week or so.
- As you can imagine, if you keep doubling every time you feed, you’ll end up with sourdough apocalypse. You use some each time you bake, but you’ll need to throw away (or give away) half the mixture before each feed if you’re not using much in your baking.
Maintaining your sourdough starter while you’re on holiday
So, the photo here shows me feeding Dougie, my sourdough starter, in the National Trust car park near Crummock Water in the Lake District. Sourdough bread is delicious, but looking after your sourdough starter is like having a pet.

If you’re not taking your starter travelling with you, you’ll need a friend to feed it, or a technique to preserve it. If you mix these methods using part of your starter for each, you’ll cut your risk of having no starter when you return.
- Fridge it. Many starters will have a little sleep in the fridge for a week, maybe even two. They’ll be hungry when you get back and may need some coaxing.
- Freeze it. Feed it, leave to rise and then put it in the freezer. When you’re ready to use it again, thaw it and feed it regularly to bring it back to life. There’s a slight risk that it won’t spring back, so be warned.
- Dry it. Feed and let it rise and ripen. Spread it over a silicone mat as thinly as possible and put in the oven at 40°C or a warm place till completely dry and brittle. Break into flakes and store in a bag. To revive, mix 4tsps with 4tsps of water water and soak for 10 minutes. Add 2 g of rye or whole grain flour and 20g of water. Leave to ferment for 12 hours. Repeat the feed and leave for 24 hours.
We’d love to hear from any other eager bread-makers and cake-bakers about how they get their flour fix while out on the road.
There are now some lovely bakeries around, but making your own bread and cakes on a campsite (or even in the wild) is fun, and is sure to start a conversation with your neighbours.

Ingenious! Use an upside-down frying basket to make toast.