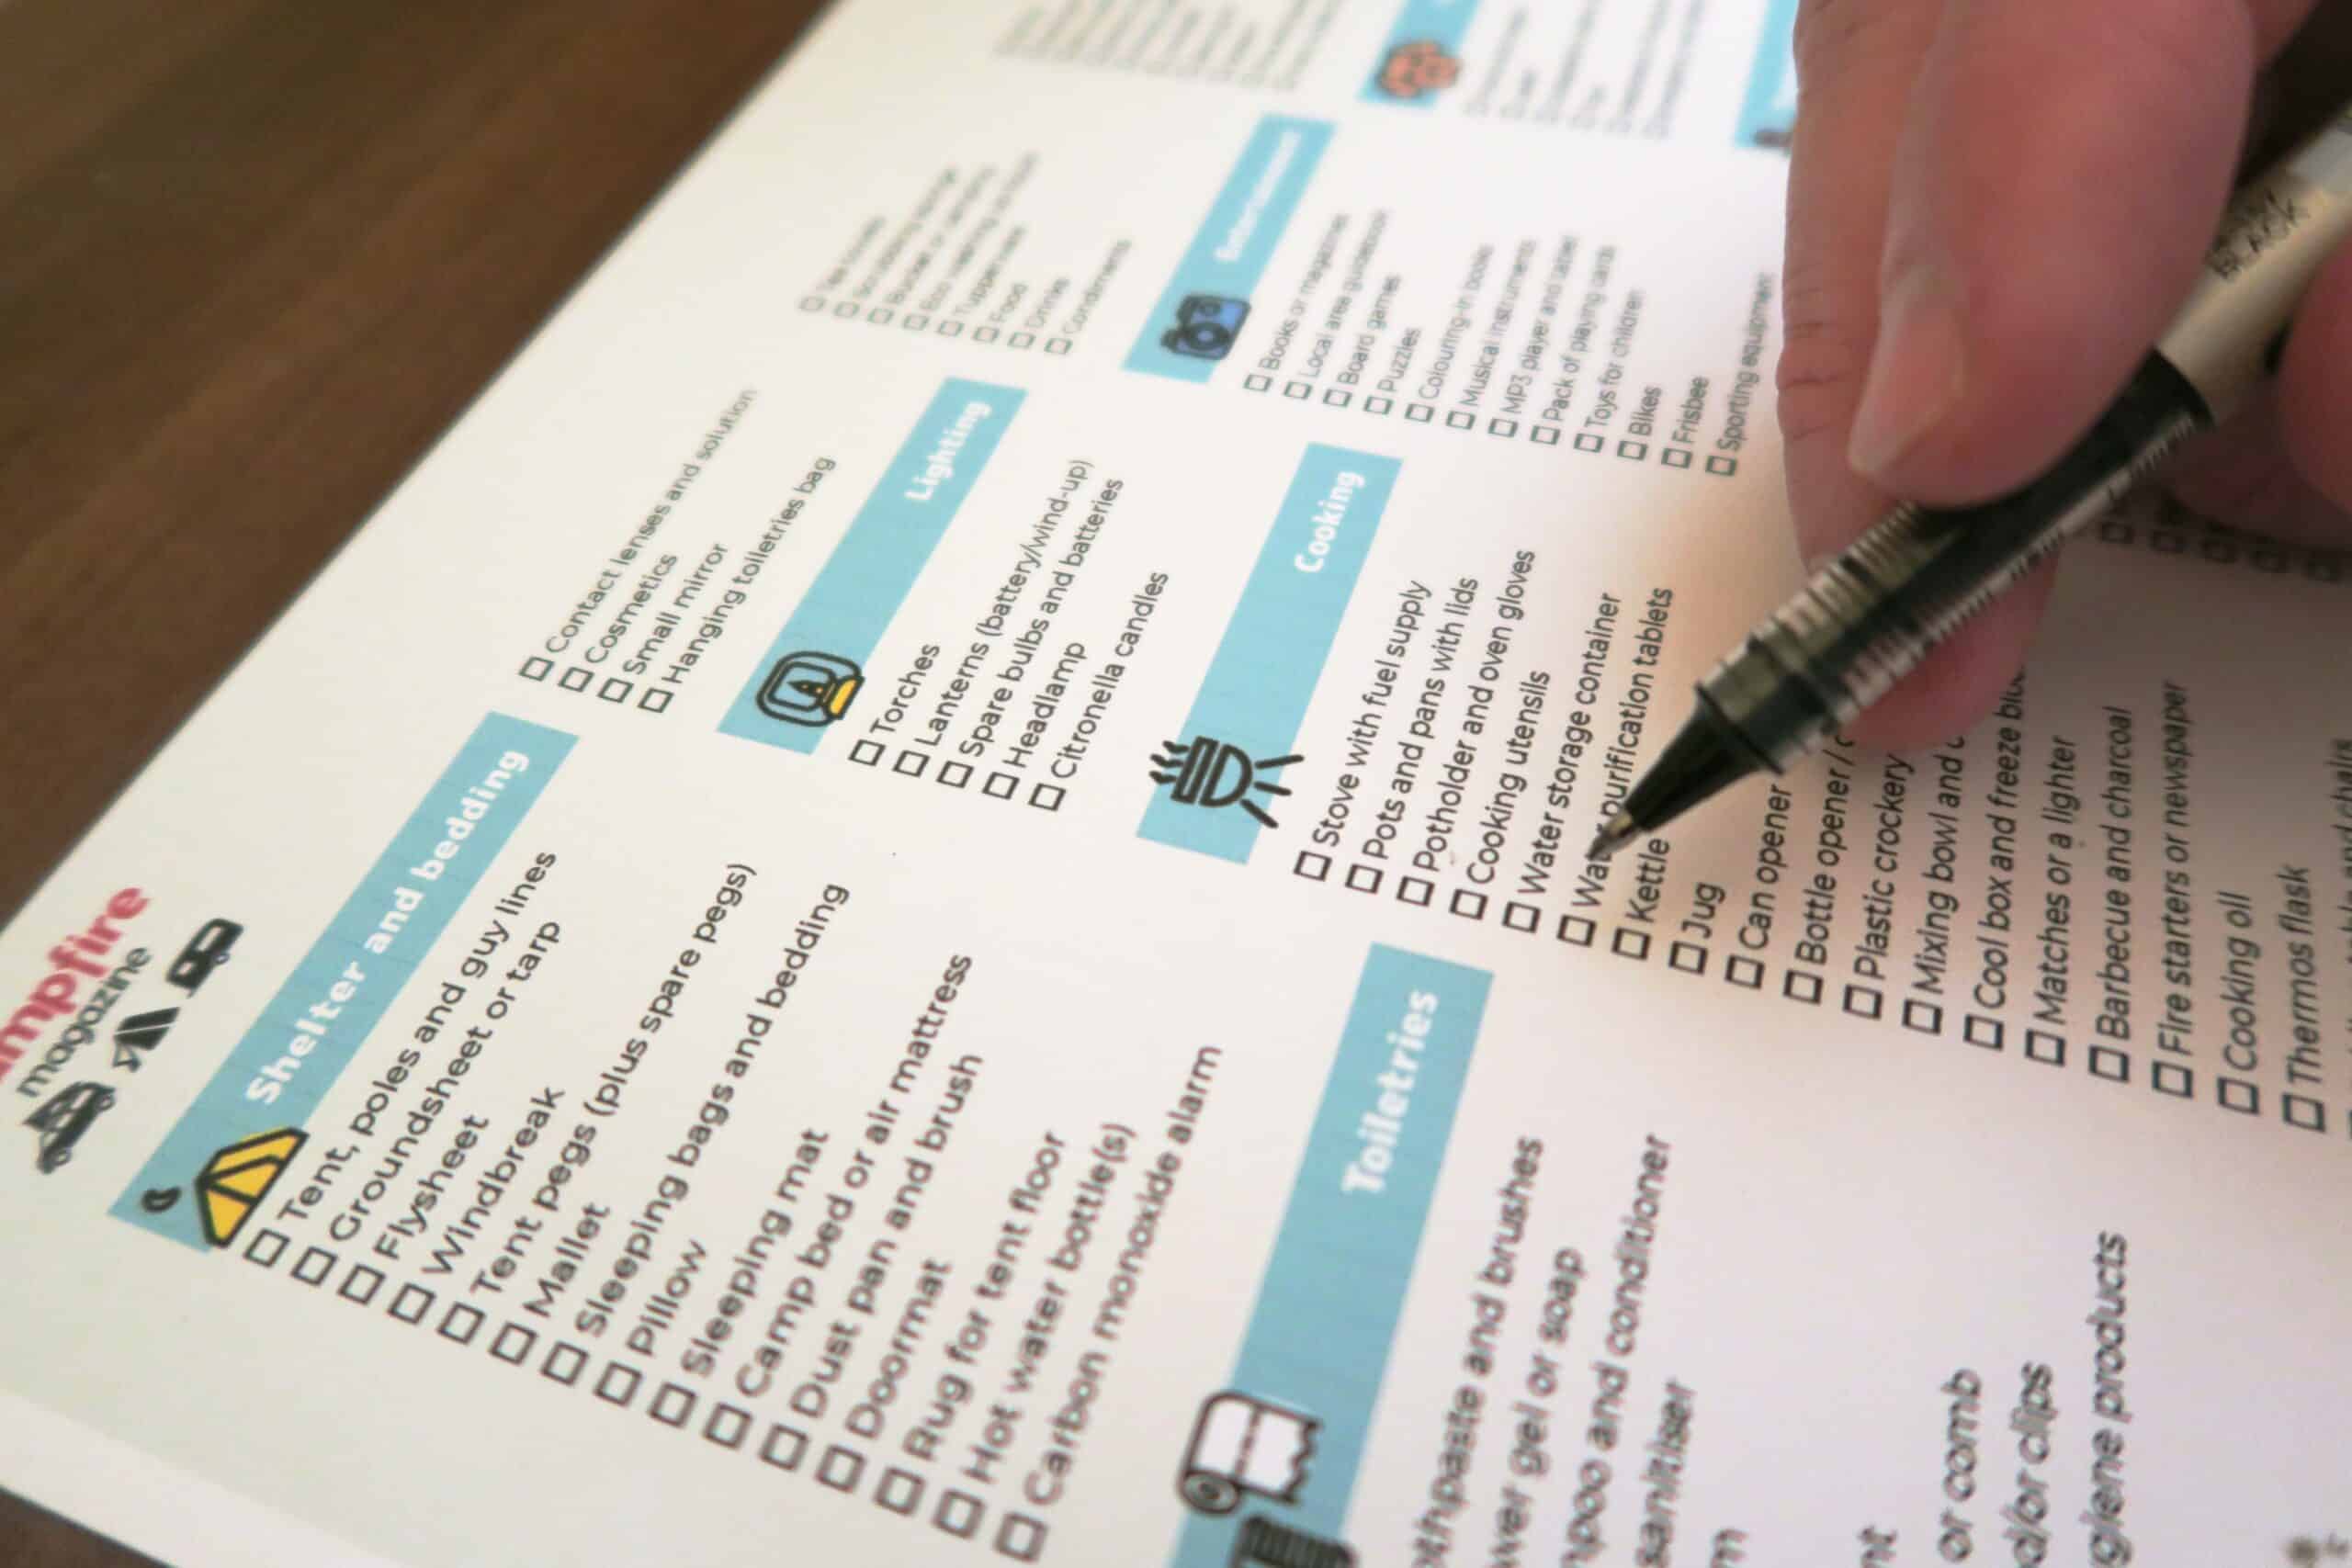
Leo Barnes knows a thing or two about camping and keeping warm in the wild outdoors if his homemade rocket stove is anything to go by.
Here, he shares his easy-to-follow recipe for a DIY rocket stove for camping and outdoor adventures.

")
What’s a rocket stove?
Rocket stoves use less fuel and they’re cleaner burning.
That’s what makes them a big deal in Africa – saving people the extra effort of collecting wood all the time and protecting them from breathing in nasty fumes
So what’s that got to do with camping and outdoor cooking here in the UK?

Well, we’ve come across five or six companies who are making rocket stoves for African communities but, by expanding their market to include UK customers, can make more stoves, keep their prices affordable for people in need.

Rocket stoves are high efficiency and they burn smokeless – no more moving seats every time the wind changes to avoid a face-full of smoke. Another advantage is that the outer surface of the stove stays cool, so you can pick it up and carry it whenever you want.
You can cook a meal on just a small handful of kindling and that it takes just 15 minutes to boil five litres of water with only 250g of wood. Stoves are usually made from stainless steel and may have a ceramic liner to keep the heat in.
Now for the science! The combustion efficiency mean most of the harmful gases are burned off before they’re released. Black carbon particles are significantly reduced, which is good for the environment.
Leo shows us how to build a rocket stove

We’ve put some great wood-burning stoves through their paces (like the one above), but there’s a low-tech, cheap alternative too.
Using just tin cans and some soil or perlite, you can make your own rocket stove.
“This was a first try ‘proof of concept’ and I was just curious to see what it could do. The stove runs on minimal fuel and burns very hot, so there’s little to no smoke. The burn is so complete that very little ash is left over as well, making for less mess to clean up. The stove does take a little time to warm up and get to optimum temperature.
I’m working on a couple of ideas to close off the top and make a pot stand. It was so easy to make. I’m sure I’ll make more. I’m very impressed with the result and I already have ideas on how to tweak my build next time.’
If you’re really not up for making your own, have a look at our top picks for gas stoves, for wood-burning stoves and for electric cooking.![]()

These stoves are designed for camping, but there are kits available so they can be used inside bell tents and safari tents. They fold down to fit into a small bag and weigh around 10kg. They’re claimed to be 10 times more fuel-efficient than an open fire.
There’s space on the top for two pots, and a lift-off plate allows you to cook over an open flame. Air-flow is controlled by an adjustable front door opening and smoke is carried away up a long chimney.
How to make your own rocket stove
Safety
- Before you start, remember that cutting tin can be dangerous. Wear stout gloves and take care. This isn’t just boring health and safety advice….you should see my sliced finger!

What you need for your rocket stove
- You need four tins in all. One large catering-size tin and three smaller ones. The large can and one of the small ones should be open at one end only. The other two small tins should be open at both ends.
Step-by step to your new camping stove
- Cut a hole in the side of the big tin about 3cm up from the bottom. The hole should be the same diameter as the small tins.
- For the inner section where the fire will be, you need to make an ‘elbow’ – that’s the essence of any rocket stove. It means fitting two cans together to create a 90-degree angle.
- Take the can with the intact bottom and cut a hole (the diameter of a small tin) close to the base.
- Hold it in the centre of the large tin and then push one of the remaining tins through the hole in the outer tin and into the small one.
- You use the third tin to extend the height of the elbow to the height of the outer can.
- So, you’ve fitted the small tins together to make an L shape inside the larger can and this shape sits in the centre of the larger tin with about 3cm of space underneath.
Insulation
- Now fill the space between the inner and outer tins with something that will act as an insulator. Leo has heavy clay soil in his garden, so he used that. Perlite would make the stove lighter for carrying around.
Fuel ‘shelf’
- The last piece to make is the shelf that holds up the fuel. Leo made this from the top of the large tin, slotting it inside the horizontal tin. Air can pass underneath to feed the fire and the shelf can move in and out, extending only far enough to hold up the non-burning part of the wood fuel.
- The burning ends of the fuel are suspended inside the combustion area to allow maximum airflow.
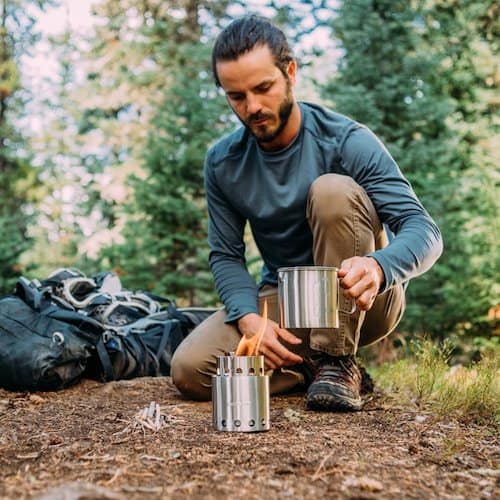
The Solo gasifying stoves aren’t just lovely looking objects, they’re some of the most efficient stoves for cooking with wood.
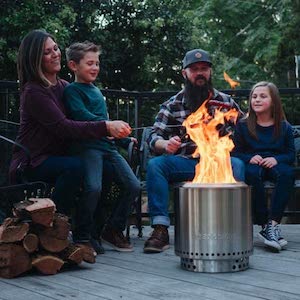
Plus, the larger Ranger is our favourite firepit for keeping warm.
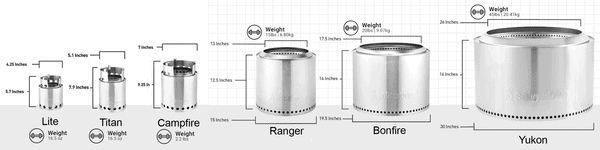
There’s a range of sizes – a backpacker’s one-to-two person option, a compact Ranger firepit, the big Bonfire and a massive Yukon.
A few dry twigs is all it takes to get it going. Rising hot air, and the absence of oxygen created by the combustion process, pulls air through the bottom vent holes in the double-walled cylinder. This air fuels the fire at its base and gives a boost of preheated air through the vent holes at the top of the burn chamber.
An ash pan catches loose ash and prevents it from clogging the airflow. It acts as a heat shield and prevents your stove from scorching the ground. Vent holes near the top of the burn chamber allow preheated oxygen to fuel the flame resulting in a more complete combustion and a hotter fire with less smoke.
Made of stainless steel, the smallest weighs 255g and the Bonfire weighs 9kg.
There are plenty of accessories available, including cooking pots and an alcohol burner attachment to use instead of wood.
Not a cheap option, but it’s one of those pieces of kit that earns a devoted following.
To buy or not to buy?
A thing of beauty, with options for efficient cooking stoves and cooking firepits without the choking smoke. So, a definite yes. In fact, we’ve just bought a Ranger for home and taking in the van as it’s a great compromise size.

Now…use your rocket stove to make a delicious shakshuka
Here’s a super-easy recipe that you can make in just one pot on your rocket stove.
Using one pan means no lugging around heavy equipment if you’re camping and less washing up, so you can spend more time running wild in the woods or sitting back with a glass of wine!
Shakshuka is a North African and Israeli dish made up of eggs poached in a gorgeous tomato sauce with chunky vegetables. It’s traditionally eaten for breakfast, and makes the perfect warming meal to fuel you up for a day of outdoor activities. In this recipe, we’ve added chunks of sausage to make it a bit more substantial for dinnertime, but feel free to play around with the ingredients depending on your tastes and what you have available.
This recipe works best with a Dutch oven or shallow pan with a lid, but if you don’t have one you can just make a quick lid out of tinfoil or put a plate over the top. We recommend serving with big chunks of crusty bread – perfect for mopping up every last bit of that gorgeous sauce! With a dollop of yoghurt or crème fraîche on top and a sprinkling of your favourite herbs, this dish is guaranteed to impress!
Ingredients
- 1 pack sausages (or meat-free sausages)
- 2 onions
- 2 red peppers
- 200g mushrooms
- 400g can tinned tomatoes
- 4 eggs (or not if you’re vegan)
- 1 tbsp cumin
- 1 tbsp paprika
- Generous pinch of brown sugar (you can use honey or any other sweetener)
- Yoghurt, crème fraîche, or chopped herbs to serve
- First get your stove going. It should only take around five minutes to get the fire ready.
- Heat a tablespoon of the oil and fry your sausages. When browned, remove from the pan, cut into chunks and set aside.
- Heat the other tablespoon of oil and add the garlic and onions. Fry for a few minutes, until the onions start to soften.
- Add your mushrooms and peppers. Cook until the veg starts to soften, around five minutes.
- Add the can of tomatoes. Stir in the cumin, paprika and brown sugar. Add the sausage chunks.
- Simmer your sauce for five minutes. Season with salt and pepper to taste.
- When the sauce has thickened, make four indents in the sauce and crack an egg into each one. Cover and leave to simmer for 10-15 minutes, until the whites of the eggs have set. If your stove is very hot, you might want to remove the pan from the heat after five minutes (keep the lid on) – the eggs will poach in the steam.
- Using a big spoon, serve into four bowls. Add any toppings you like – yoghurt or nuts and seeds work well, as do any of your favourite herbs. We like coriander or parsley.