We wanted to challenge our woodburning camping stove testers to make an al fresco feast. They more than rose to the occasion, and the result was delicious.
The curry, marinated paneer and chapattis tested all the cooking methods – boiling and simmering, frying, on-the-hob toasting and even pretend tandoor cooking – but took only an hour in total.
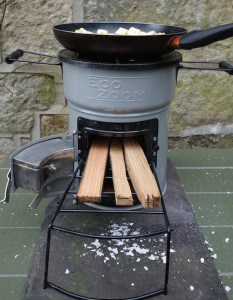
A pan of marinated paneer cooking nicely on one of the rocket stoves we tested. Have a look at which woodburning stoves we liked best.
Spinach and lentil curry
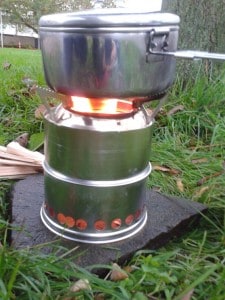
A pan of curry bubbling on the simplest woodgas stove.
- Three medium-sized onions, chopped
- Three or four cloves of garlic, chopped
- Finely chopped or grated ginger
- Four big cupfuls of red lentils (or use two tins of lentils for super-fast cooking)
- Fresh, frozen or tinned spinach
- Chilli
- Turmeric, cumin, coriander
- Garam masala
- Chopped fresh coriander
- Salt to taste
- Fry the onion, garlic and ginger in a little oil till softened and fragrant.
- Add the chilli and spices (apart from the garam masala and fresh coriander). Fry for a couple of minutes, adding a bit more oil if it looks to be sticking.
- Add the lentils and enough water to come an inch or so above. You can always add more water if it starts to get too thick.
- Bring to the boil and then simmer with a lid on until the lentils are soft. Add the spinach and garam masala and cook for another five minutes or so.
- Add the fresh coriander and salt.
- If you’re making the marinated paneer to go with this, add it when it’s golden and crispy, just before serving.
- For extra speed, forget the spices and throw in a pot of curry paste or sauce – have a look at our tasty cheats section for more time-saving readymades.
- You can also add tomatoes, fresh or tinned, and any other vegetables you fancy – peas or cauliflower in small pieces would be nice.
Easy-peasy chapattis

Curry simmering, chapatti chapatti-ing on the DWD/Outbacker stove.
Of course the actual easiest thing to do when camping is to buy readymade chapattis. They tend to be a bit dense and chewy, though.
It’s no big deal to mix up a batch of dough while camping, but you can also make it at home the day before and store it in a lidded box in the cooler ready for rolling and cooking on site. The pleasure of eating them freshly rolled and cooked is worth the effort.
- Five or six tablespoons of chapatti flour per person – you don’t need to be exact at all because you now simply add enough cold water to make a soft, kneadable dough. Too wet, add a bit more flour. You could use wholemeal flour instead, but it’s never quite the same. You don’t need salt (unless you really do!)
- Knead for three or four minutes till it’s nice and smooth, and put in the fridge or coolbox for 20 minutes to rest. Tear off chunks and roll into balls – how big depends on how big you want your chapattis. We tend to go for around the size of a large egg.
- Sprinkle flour on your chopping board and, if you don’t take your rolling pin camping (and why would you!), use a floured wine bottle to roll out fairly thinly.
- Cook in a heated frying pan (or even on the top of a flat stove like the Frontier) till you see air starting to form inside, then flip for a minute or so.
- Keep them warm as you cook the rest by wrapping in a tea-towel.
Have a look at our rather delicious info and tips on baking when camping, using clever workarounds.
Marinated paneer

Using tiny bits of wood to fire up the Biolite stove ready for cooking.
It’s fairly easy to get this bland-till-you-spice-it Indian cheese these days and its advantage over halloumi is that it doesn’t go through that watery phase when cooking. Plus you can regulate its saltiness.
It’s great for frying and great on skewers with vegetables for a meat-free kebab. Use firm tofu as a vegan alternative.
- Two packs of paneer (ours were around 225g packs)
- Grated or finely chopped garlic and ginger
- Chilli
- Pinch of salt
- Squeeze of lemon
- Your choice of spices – ground cumin, coriander, garam masala, smoked paprika
- Cut the cheese into chunks and mix in a bowl with the other ingredients. Leave to marinate for between 30 minutes or a few hours, in a camping coolbox or camping fridge if you’re somewhere warm.
- Either thread onto skewers with your choice of vegetables and griddle or barbecue, or fry in a small amount of oil till golden on both side.
- We like to add ours to the curry just before serving.
Raita salad
Cucumber
- Tomato
- Onion
- Plain yoghurt (avoid sweetened ones if you’re using dairy-free)
- Cumin, coriander, mustard or sesame seeds – dry-fried or toasted
- Chopped fresh mint or a dollop of mint sauce
- Pinch of salt
Now you can chop on the road! We love our hand-operated easy-pull processor
- Chop up your salad ingredients – fine or chunky is up to you. You can also add whatever else you have around, such as radish, peppers and so on. We used our favourite camp kitchen toy…the Zyliss hand-powered food chopper/processor. Whizzy!
- Mix with the yoghurt, a sprinkling of seeds and the mint.
- Add the salt just before you serve, as otherwise it tends to make the cucumber and tomato release their juices, which makes for runny raita.
Don’t forget your camping spice tin
Make yourself a neat camping box of herbs and spices and you’ll never have to rummage in your kitchen bag again.
If you’ve got a weigh-and-save or zero-waste shop near you, you can refill containers like these more cheaply and with less wasted packaging too. We all have our own essentials and favourites, so pick and mix to suit, but here’s what we always have:
Curry powder, Mixed herbs, Chilli powder, Cumin, Coriander, Chinese five spice, Garam masala, Whole spices (cardamom, star anise, cloves), Smoked paprika, Dried lime leaves, Sesame seeds
A masala dhaba is a great idea, providing it has airtight lids or a double outer lid.
Go for a neat set of magnetic tin
Or simple stackable boxes with transparent lids so you don;’t have to open every box to check what’s inside.
This lovely German set of spice and herb tins has good lids and all the labels you need to keep things organised.